In Plain English
Inpainting lets you circle a region of an existing image and tell an AI to regenerate only that region — seamlessly blending the result with the pixels you kept. Outpainting does the opposite: it extends the canvas beyond the original borders, generating new content that continues the scene outward.
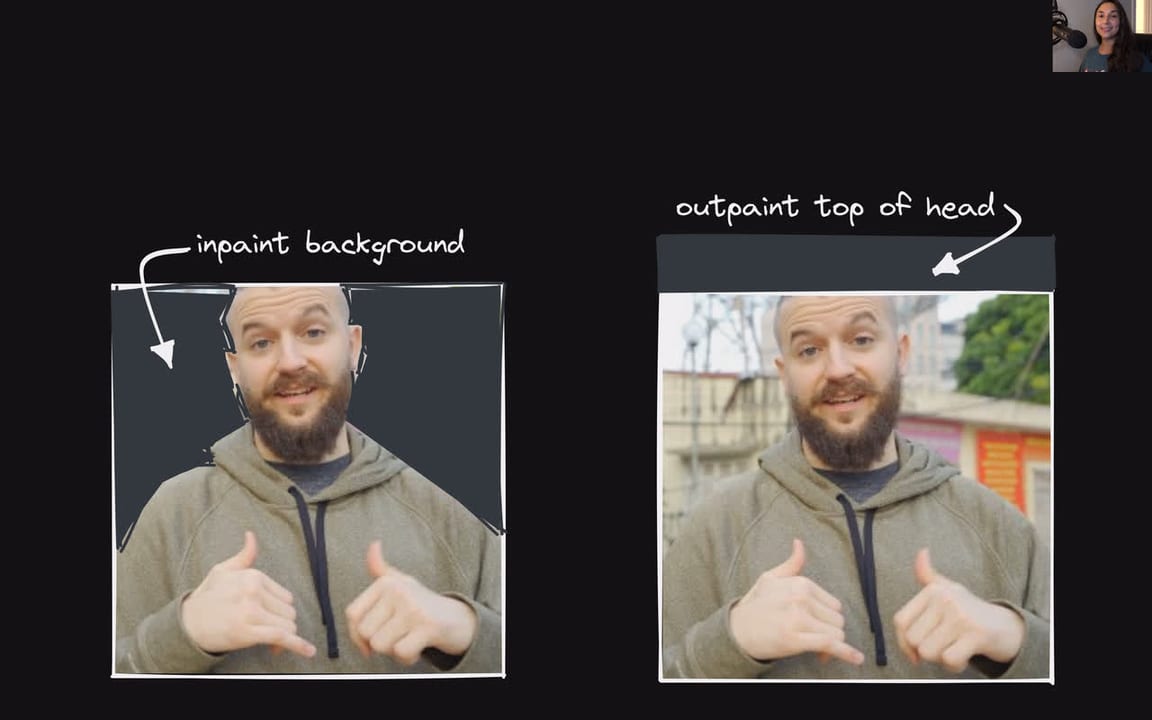
Think of a photo editor who can do two magic tricks. First trick: you hand them a family portrait with an unwanted lamppost in the corner. They cut out just the lamppost, hand it back, and a few seconds later the wall behind it is filled in perfectly — matching the texture, lighting, and perspective of the surrounding area. That is inpainting. Second trick: you hand them that same portrait and say 'I wish this showed more of the room.' They tape extra paper around the edges and paint the room extending outward, matching the furniture style, the light source, and the colour palette of the original. That is outpainting.
Both tricks are powered by the same underlying technology — diffusion models — but they target different spatial problems. Inpainting replaces content inside the original boundary. Outpainting generates content outside it.
Why It Matters for Builders
Before inpainting and outpainting existed, editing an AI-generated image meant re-rolling the entire generation, crossing your fingers, and hoping the new result happened to fix the one thing you disliked. That is slow, wasteful, and often counterproductive — a re-roll that fixes the hand might ruin the face.
These two techniques are the foundation of modern AI image editing workflows because they give you surgical control over the output:
- Product photography: Remove studio equipment, swap backgrounds, or extend a square shot to a landscape banner without a new shoot.
- Generative art iteration: Lock in the parts of an image you love and regenerate only the parts you don't.
- Asset re-sizing: Outpaint a 1:1 social image to 16:9 for a YouTube thumbnail or 9:16 for a Story without cropping.
- Visual effects pipelines: Composite AI elements into live footage by inpainting a mask frame-by-frame.
- Accessibility and restoration: Reconstruct damaged or occluded regions in archival images.
For developers specifically, both operations are exposed as API primitives in every major image generation platform, making them straightforward to embed in product features — a background-swap button, a canvas expand tool, or an object-removal eraser.
How It Works
Both inpainting and outpainting are built on top of latent diffusion models — the same architecture that powers image generators like Stable Diffusion and FLUX. To understand the editing operations, it helps to understand what diffusion models do at inference time: they start from pure noise and iteratively remove it over many steps, guided by a text prompt, until a coherent image emerges.
Inpainting: mask-guided denoising
When you inpaint, you provide two inputs alongside a prompt: the original image and a binary mask — a black-and-white image where white pixels mark the region to regenerate and black pixels mark the region to keep.
The model encodes both the image and the mask into latent space — a compressed mathematical representation roughly 8x smaller than the pixel grid. During each denoising step, the model predicts noise for the entire latent. But only the masked region's latents are actually updated; the unmasked region is reset to the original image's encoded values after every step. This forces the model to generate content for the masked area that is consistent with the fixed surroundings — matching colour, lighting, and style automatically.
The key parameter you control is denoising strength (0.0 to 1.0). A value near 0 barely alters the masked region; a value near 1 gives the model maximum freedom to invent new content. For object removal, values in the 0.4–0.6 range preserve context well. For inserting a completely new object, 0.7–0.9 is more appropriate.
Outpainting: inpainting at the edges
Outpainting is technically a specialised form of inpainting where the mask sits outside the original image boundary. The pipeline expands the canvas in the chosen direction — say, 512 pixels to the right — leaving the new area blank. That blank area is the 'mask'. The model then sees the original image as context and generates the blank region to continue the scene.
Because the new region starts with no pixel data at all, the model relies entirely on the content at the edges of the original image — textures, horizon lines, lighting angles — to infer what should logically appear. Modern models like FLUX.1 Fill encode this boundary context in the latent space, letting them match perspective and atmosphere across several hundred pixels of new canvas.
- Mask is inside the original image
- Surrounding pixels provide context
- Goal: blend new content into existing scene
- Common use: remove objects, fix details, swap elements
- Canvas size stays the same
- Mask is outside the original image boundary
- Edge pixels provide the only context
- Goal: extend the scene beyond its borders
- Common use: change aspect ratio, widen backgrounds
- Canvas size grows
Tools and Platforms
The inpainting and outpainting landscape splits into two camps: consumer-friendly apps with polished brush UIs, and developer-facing APIs and local pipelines that give you programmatic control.
Consumer and prosumer apps
| Tool | Strengths | Notes |
|---|---|---|
| Adobe Photoshop Generative Fill | Pixel-accurate brush, non-destructive layers, Firefly Image 4 backend with 2K output | Requires Creative Cloud subscription; best tool for professional photo editing workflows |
| Adobe Firefly (web) | Outpainting via Generative Expand, strong aspect-ratio conversion | Best-in-class outpainting according to 2026 head-to-head benchmarks |
| ChatGPT / DALL-E editor | Natural-language masking via ChatGPT UI, no drawing required | API lacks inpainting endpoint as of mid-2026; web-only for edits |
| Canva AI | Magic Eraser and Expand tools for non-technical users | Powered by Stable Diffusion variants under the hood |
| getimg.ai / Pixlr / Photoroom | Browser-based, no install, supports SDXL and FLUX backends | Good for quick iterations without a local GPU |
Local and API pipelines
| Tool / Model | What it offers | Notes |
|---|---|---|
| FLUX.1 Fill [pro] (Black Forest Labs) | Purpose-built inpainting + outpainting model, binary mask + prompt | Available via BFL API and Replicate; preserves lighting and perspective well |
| SDXL Inpainting (Hugging Face diffusers) | Open-weight SDXL checkpoint fine-tuned for inpainting | Runs locally; combine with ComfyUI or Automatic1111 for a full UI |
| ComfyUI | Node-based workflow builder; supports SDXL, FLUX, ControlNet, IPAdapter for style-consistent inpainting | Steeper learning curve; maximum flexibility for custom pipelines |
| Hugging Face diffusers (Python) | Programmatic access to StableDiffusionInpaintPipeline and FluxFillPipeline | Best choice for embedding inpainting into a Python application |
from diffusers import FluxFillPipeline
import torch
from PIL import Image

pipe = FluxFillPipeline.from_pretrained(
    "black-forest-labs/FLUX.1-Fill-dev",
    torch_dtype=torch.bfloat16
).to("cuda")

image = Image.open("photo.png").convert("RGB")
mask  = Image.open("mask.png").convert("RGB")   # white = regenerate

result = pipe(
    prompt="a wooden park bench",
    image=image,
    mask_image=mask,
    height=image.height,
    width=image.width,
    num_inference_steps=28,
).images[0]

result.save("edited.png")Common Pitfalls and Best Practices
Even with a strong model, inpainting and outpainting can produce jarring seams, inconsistent lighting, or content that contradicts the rest of the image. Knowing the failure modes makes it much easier to avoid them.
Masking mistakes
- Mask too tight: If your mask exactly traces the object you want to remove, the model has no room to blend. Extend the mask a few pixels beyond the object's actual edge.
- No mask blur: A hard mask edge creates a visible seam. Apply a blur of 8–16 pixels to feather the transition zone.
- Masking background instead of subject: When removing an object, mask the object itself — not the area you want preserved.
Denoising strength calibration
- Too low (< 0.4): The model barely alters the masked area — the original content bleeds through as artefacts.
- Too high (> 0.9): The generated content looks great on its own but disconnected from the surrounding image — mismatched lighting or texture.
- Sweet spot: 0.65–0.80 works for most tasks. Use the lower end for subtle fixes (smoothing skin, removing small objects) and the upper end for inserting entirely new elements.
Outpainting seam fixes
- Generate in overlapping strips: extend 30% into existing content so the model has strong context at the join.
- Run a second inpainting pass along the seam with a narrow mask and denoising strength 0.3–0.4 to smooth any remaining discontinuity.
- Describe what is off-screen in your prompt — 'continuation of a sunlit beach with palm trees' gives the model clearer guidance than a blank prompt.
Going Deeper
Once you are comfortable with basic inpainting and outpainting, several advanced techniques unlock more precise results.
ControlNet for structure-preserving edits
Standard inpainting replaces the masked region with content that matches colour and texture but may not respect the structural geometry of the scene. ControlNet solves this by conditioning the denoising process on an additional signal — a depth map, a Canny edge map, or a pose skeleton — extracted from the original image. The result: an inpainted region that respects the 3-D layout, keeping a wall straight, a face in the correct pose, or a shadow in the right direction.
Instruction-based editing vs mask-based editing
Newer models like FLUX.1 Kontext (released mid-2025) blur the line between inpainting and instruction-based editing. Instead of drawing a mask, you describe the edit in natural language: 'replace the red car with a blue bicycle'. The model internally localises the relevant region and applies the change. This is sometimes called zero-mask inpainting and it reduces friction for non-technical users — though it offers less precision than a hand-drawn mask for complex spatial edits.
IPAdapter for style-consistent inpainting
When you inpaint or outpaint into a stylised image — a watercolour painting, a pixel-art sprite, a cartoon — the default model may generate photorealistic content that clashes with the style. IPAdapter (Image Prompt Adapter) lets you feed a reference image as a style guide alongside the mask and text prompt. The denoised content then adopts the colour palette and brush-stroke quality of the reference, keeping edits visually coherent.
Tiled outpainting for very large canvases
When outpainting to several times the original resolution — for instance, turning a portrait thumbnail into a full desktop wallpaper — generating the entire extension in one pass often lacks fine detail. Tiled outpainting splits the target canvas into overlapping tiles, generates each independently with overlapping context, then blends the tiles together. Tools like ComfyUI's UltimateSDUpscale node implement this pattern natively.
Video inpainting
The same principles extend to video: mask a region across frames and regenerate it consistently. This is significantly harder because the model must maintain temporal consistency — the inpainted content cannot flicker or drift between frames. Models like RunwayML's inpainting tools and Meta's VideoComposer address this with frame-level conditioning and attention over multiple frames simultaneously. Expect the field to mature rapidly as video generation models improve through 2026.
FAQ
What is the difference between inpainting and background removal?
Background removal simply cuts pixels away, leaving transparency. Inpainting goes further: after removing an element, it generates new content to fill the gap — a wall, a floor, sky — so the result looks like the removed object was never there. Most AI photo tools combine both steps.
Do I need a GPU to run inpainting locally?
For SDXL or FLUX models, a dedicated GPU with at least 8 GB of VRAM is recommended for comfortable speed. SDXL inpainting can run on an 8 GB card with attention slicing enabled. If you do not have a suitable GPU, cloud API options (FLUX.1 Fill via Replicate, Adobe Firefly, getimg.ai) let you run the same quality models through a browser or REST call.
Why does my inpainted region look like a pasted sticker — mismatched lighting or sharpness?
This usually means the denoising strength is too high (the model generated content without enough constraint from surroundings) or the mask edge was too sharp. Lower the denoising strength to 0.6–0.7, feather the mask by 10–15 pixels, and re-run. A second light-touch inpainting pass along the edge with denoising strength 0.3–0.4 can also smooth a persistent seam.
Can I outpaint an image to a completely different aspect ratio?
Yes — this is one of the most practical uses of outpainting. You can take a square 1:1 image and extend it to 16:9 widescreen by outpainting on the left and right edges. Adobe Firefly's Generative Expand tool is particularly well regarded for this. For large extensions, generate in an overlapping strip rather than trying to fill the entire new area in one pass.
Is there an inpainting API I can call from code without running a local model?
Yes. Black Forest Labs offers the FLUX.1 Fill [pro] REST API at api.bfl.ml. Replicate hosts several inpainting models including FLUX.1 Fill and SDXL-Inpainting via a simple API. The OpenAI Images Edit endpoint also supports inpainting (via DALL-E), though DALL-E inpainting is not yet available through the API as of mid-2026 — only through the ChatGPT web interface.
What is 'zero-mask inpainting' and when should I use it?
Zero-mask inpainting (also called instruction-based editing) uses a natural-language command — 'change the red jacket to blue' — without requiring you to draw a mask. The model infers the region internally. It is faster and more accessible, but less precise than a hand-drawn mask when you need exact spatial control. Models like FLUX.1 Kontext and the image editing built into ChatGPT (GPT-5 family) support this approach.