In plain English
A normal text-to-image model starts from pure visual noise — a screen of random static — and slowly cleans it up until a picture matching your prompt appears out of nowhere. Image-to-image (often shortened to img2img) changes the starting point. Instead of beginning from random noise, the model begins from a picture you supply, and reshapes it toward your prompt. You are not describing a scene from scratch; you are handing the model a draft and saying make it better, or make it different, but keep this as your anchor.
Think of a painter copying a photograph. If you tell them paint this exactly, they reproduce it faithfully. If you say paint this, but in the style of Van Gogh, they keep the same composition — the same person, the same pose, the same horizon line — but swap brushwork, colour, and texture. The photo is their reference; how far they stray from it is a choice. Image-to-image gives you a dial for exactly that choice, called denoising strength (or just strength).
Why it matters
Text-to-image is powerful but blind: it has no idea what your picture looks like. If you already have an image — a photo, a rough sketch, a 3D render, a screenshot — you are throwing away free information by describing it in words and hoping the model guesses right. Image-to-image lets the model see your starting point, so it can build on what is already there instead of reinventing it.
That unlocks a set of jobs text-to-image handles badly or not at all:
- Style transfer. Keep the exact composition of a photo but render it as an oil painting, a watercolour, an anime cel, or a pixel-art sprite. The subject and layout survive; only the visual style changes.
- Sketch-to-render. Draw a crude shape — a couch, a building, a character pose — and let the model turn it into a polished image that respects your layout. Your scribble controls where things go; the prompt controls what they are.
- Photo cleanup and variation. Start from a real photo and nudge it: brighten a dull shot, change the season, age a face, or produce ten variations of a product photo that all share the same framing.
- Iterating on a generation you liked. You generated something almost-right with text-to-image. Feed that result back in as the starting image and refine it, instead of rolling the dice on a fresh prompt and losing the parts you liked.
The common thread: when you care about structure — composition, pose, layout — image-to-image preserves it for free. Asking a text-to-image prompt to reproduce a specific layout is frustrating and unreliable; handing the model the layout as an image is the natural fix.
How it works
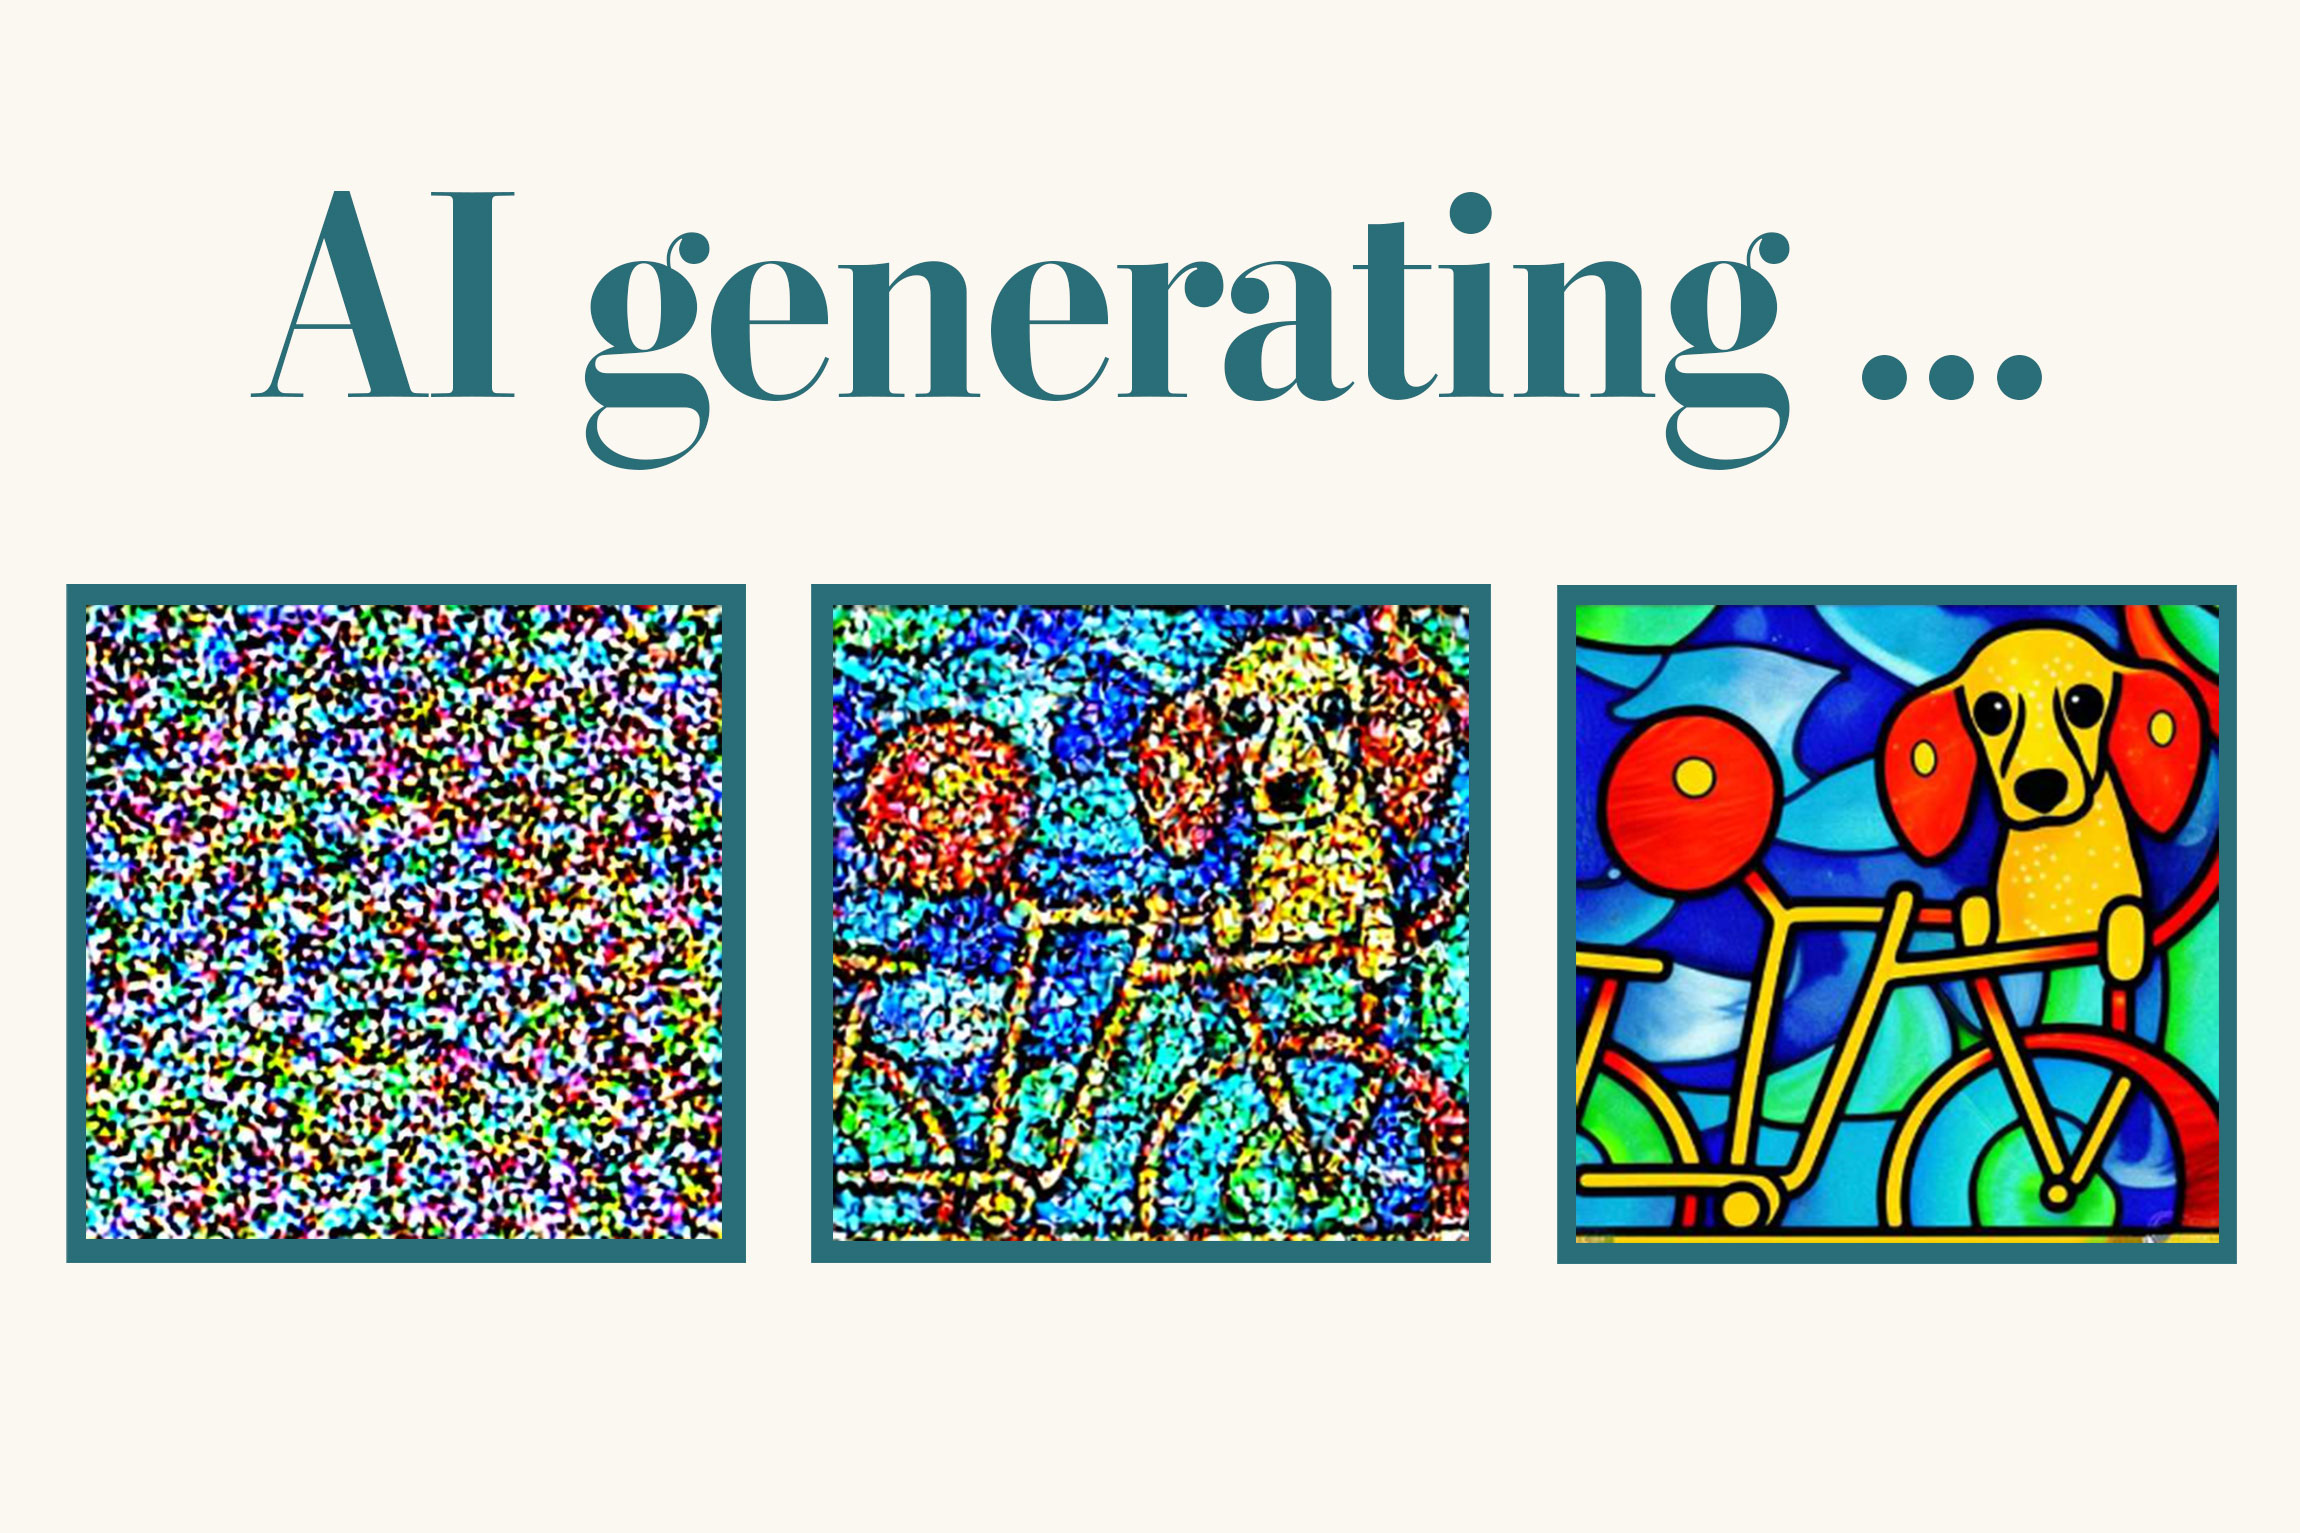
To understand image-to-image you need one idea from diffusion models: they generate by removing noise. Training teaches the model to take a noisy image and predict a slightly cleaner version. Text-to-image runs that cleanup from the worst possible start — 100% noise — across many steps until a full picture emerges.
Image-to-image plays the same game, but it doesn't start from full noise. It takes your image, adds a controlled amount of noise to it, and then lets the model denoise from there. Because the model is cleaning up a noised version of your picture rather than pure static, the structure of your original tends to survive — the more noise you skip, the more it survives.
The strength dial is the whole game
Denoising strength is a number from 0 to 1 that controls how much noise gets added to your image before the model starts cleaning it up. It is the single most important setting in image-to-image, and the one beginners get wrong most often.
- Low strength (≈0.2–0.4) adds only a little noise. The model has barely any room to change things, so the result stays very close to your original — good for subtle touch-ups, light style shifts, and cleanup.
- Medium strength (≈0.5–0.7) is the sweet spot for most creative edits. Composition and major shapes survive, but colour, texture, lighting, and style can change a lot. This is where sketch-to-render and style transfer live.
- High strength (≈0.8–1.0) adds so much noise that little of the original survives. At 1.0 you have effectively destroyed the image and are back to plain text-to-image — your reference is ignored.
The two classic failure modes both come from this dial. Nothing changed means your strength was too low — you barely noised the image, so the prompt had nothing to do. A completely different picture means your strength was too high — you noised away everything the model could anchor to. When an img2img result surprises you, the fix is almost always to adjust strength, not the prompt.
- Stays close to original
- Subtle touch-ups, cleanup
- Prompt has little effect
- Risk: nothing changes
- Keeps layout + composition
- Changes style, colour, texture
- Best for most edits
- The creative sweet spot
- Little original survives
- Prompt dominates
- 1.0 = plain text-to-image
- Risk: totally new image
A worked example
Say you have a phone photo of your living room and you want it reimagined as a cozy cabin interior, keeping the furniture layout. Here is the rough flow with a typical diffusion library — the API names vary by tool, but every img2img call comes down to the same four inputs: an init image, a prompt, a strength, and a seed.
from PIL import Image

# 1) Your starting picture — the model will anchor to this.
init_image = Image.open("living_room.jpg").convert("RGB")

# 2) Run image-to-image. strength is the dial from 0..1.
result = pipe(
    prompt="cozy wooden cabin interior, warm firelight, rustic",
    image=init_image,
    strength=0.6,      # keep the layout, restyle everything else
    guidance_scale=7,  # how hard to follow the text prompt
    seed=42,           # fix this to compare strength values fairly
).images[0]

result.save("cabin.png")
The practical workflow is to sweep the strength while keeping the prompt and seed fixed. Render at 0.4, 0.55, and 0.7 of the same photo and seed, then pick the one that balances kept the room against looks like a cabin. Fixing the seed matters: it removes random variation so the only thing changing between renders is the dial you are studying.
Image-to-image vs text-to-image
Both produce an image from a prompt and both use the same underlying diffusion model. The only real difference is the starting point — and that one difference decides which tool fits a job.
| Text-to-image | Image-to-image | |
|---|---|---|
| Starts from | Pure random noise | Your reference image |
| You control layout by | Wording (unreliable) | The input image (direct) |
| Best for | New scenes from imagination | Editing, restyling, refining |
| Key dial | Guidance scale | Denoising strength |
| Reproducibility | Prompt + seed | Prompt + seed + input image |
A simple rule of thumb: if you can picture the layout you want and could even sketch it, reach for image-to-image. If you only have a description and no fixed composition in mind, text-to-image is the cleaner start. Many real workflows chain them — generate a base with text-to-image, then refine it with image-to-image. For getting the prompt itself right in either mode, see image generation prompting.
Common pitfalls
- Treating strength as a quality knob. Strength is not "how good" — it is "how much change." Cranking it up doesn't improve the image; it just throws away more of your original. Tune it for the amount of change you want, then judge quality separately.
- Changing the prompt and the strength at once. When two variables move together you can't tell which caused the result. Fix the seed, fix the prompt, and move strength alone — then lock strength and tune the prompt.
- Expecting a low strength to honour a big prompt change. Asking for "turn this car into a dragon" at strength 0.3 will fail — there isn't enough room to change that much. Big conceptual changes need higher strength (and accept that layout will drift).
- Feeding a tiny or low-quality init image. The model inherits your input's resolution and artifacts. A blurry, low-res starting image tends to produce a blurry, low-res result. Start from the best source you have.
- Forgetting it can't add detail it can't see. Image-to-image reshapes what is present; it doesn't magically know what was behind an object or outside the frame. To extend the canvas or replace a hidden region, you want inpainting or outpainting instead.
Going deeper
Plain image-to-image gives you one blunt instrument — the strength dial — to trade structure against change. The frontier of this field is about getting finer control than that single slider allows.
ControlNet and structure conditioning. A pure img2img pass mixes everything together: shape, colour, and texture all bend with strength. ControlNet-style methods let you extract just one aspect of your reference — its edges, its depth map, or a human pose skeleton — and force the new image to follow only that, while leaving everything else fully free. That is how you keep an exact pose but change the entire scene, something raw strength can't do cleanly.
Image prompting and reference styles. Newer tools accept a reference image not as the canvas but as a style or subject example — "make a new image that looks like this" or "keep this character's face across scenes." That is a cousin of image-to-image: the reference guides generation without being the literal starting frame.
Where the model came from matters. The behaviour of the strength dial depends on the family of model underneath. Most image-to-image today runs on diffusion (see what is Stable Diffusion), but some image models are autoregressive and edit differently — the diffusion vs autoregressive comparison explains why the same setting can feel different across tools.
The durable lesson is the one to leave with: image-to-image is just text-to-image that starts partway through the denoising process instead of at the beginning, and the strength dial decides how partway. Master that single intuition — low strength keeps your image, high strength keeps your prompt — and most of the surprising results stop being surprising.
FAQ
What is image-to-image generation?
Image-to-image (img2img) is a way of generating a new picture that starts from an existing image instead of from random noise. The model adds noise to your input image and then denoises it toward your text prompt, so the result keeps some of the original's structure while changing style, colour, or detail. It is mainly used for editing, restyling, and refining images rather than creating them from scratch.
What is denoising strength in image-to-image?
Denoising strength is a number from 0 to 1 that controls how much noise is added to your input image before the model rebuilds it. Low strength (around 0.3) keeps the result close to the original; medium strength (around 0.6) preserves the layout but changes style and texture; strength near 1.0 ignores your image entirely and behaves like plain text-to-image.
What is the difference between image-to-image and text-to-image?
Text-to-image starts from pure random noise and builds a scene purely from your words. Image-to-image starts from a picture you supply and reshapes it toward your prompt, so it preserves composition and layout that text alone struggles to control. They use the same underlying model — only the starting point differs.
Why does my image-to-image result look exactly the same as the input?
Your denoising strength is too low. At low strength the model only adds a tiny amount of noise, so it has almost no room to apply your prompt and the picture barely changes. Raise the strength (try 0.5–0.7) to give the model room to make a visible difference.
Why did image-to-image produce a completely different picture?
Your strength was too high — close to 1.0 it adds so much noise that nothing of your original survives, which is effectively plain text-to-image. Lower the strength (try 0.4–0.6) so the model still has your composition to anchor to.
Is image-to-image the same as inpainting?
No. Image-to-image transforms the whole frame at once, anchored to your reference image. Inpainting masks a specific region and regenerates only that part while keeping the rest of the pixels untouched. Use image-to-image to restyle or refine an entire picture, and inpainting to fix or replace one area.