In plain English
A normal text-to-image model takes a sentence and dreams up a picture. You type "a knight standing on a cliff at sunset" and a diffusion model paints something that matches the words — but you have almost no say over the exact pose, the camera angle, or where things sit in the frame. The model decides all of that. Re-run the same prompt and the knight faces a different way, stands somewhere else, holds the sword differently. Words are great at describing content and terrible at pinning down layout.
ControlNet fixes that by letting you hand the model a second input alongside the text: a structural reference. That reference can be a stick-figure pose, an edge outline, a depth map, or a rough scribble. The model still invents all the colors, textures, and style from your prompt — but it must respect the structure you supplied. You stop describing and hoping and start showing the model the shape you want.
Think of it like the difference between phoning an artist and reading them a description, versus faxing them a tracing-paper outline and saying "paint inside these lines, make it a knight at sunset." The outline fixes the composition; the words fix everything else. ControlNet is that tracing-paper outline for image generation.
Why it matters
Prompting alone hits a hard ceiling the moment you care about where things go, not just what they are. ControlNet exists to break that ceiling, and it solves a few very practical problems at once.
- Layout control. You can lock the exact pose of a character, the perspective of a room, or the silhouette of a product. No amount of prompt wording reliably gives you "left hand raised, looking over the right shoulder" — a pose reference does it in one shot.
- Repeatability. Need the same character in the same pose across ten images with ten different outfits? Feed the same pose map each time. The structure stays fixed while the prompt changes the rest.
- Working from real references. Designers already have a photo, a 3D render, a sketch, or a floor plan. ControlNet turns that existing artifact into the skeleton of a new image instead of forcing you to re-describe it in words.
- Fewer wasted generations. Without structural control you roll the dice and discard most outputs. With a control image, far more results are usable on the first try because the hard-to-prompt part is already fixed.
Who cares? Concept artists matching a storyboard, e-commerce teams placing products consistently, architects turning sketches into renders, game studios keeping a character on-model, and anyone who has ever typed the same prompt twenty times trying to nudge a hand into the right place. If your problem is composition, not content, this is the tool.
ControlNet didn't replace prompting — it sits on top of it. You still write a good prompt for style, mood, and subject. ControlNet just adds a layer of structural guidance that text was never good at expressing.
How it works
ControlNet works in two stages. First you turn a reference image into a condition map — a simplified picture that captures only the structure you want to keep. Then that map steers the diffusion process while it generates.
Step 1 — extract a condition from a reference
You rarely draw the condition by hand. A preprocessor (also called an annotator) runs over your reference image and strips it down to one kind of structure. The same photo of a person can become a pose skeleton, an edge outline, or a depth map depending on which preprocessor you pick. Each one throws away most of the image and keeps just the signal that control type cares about.
Step 2 — inject the condition into generation
A diffusion model normally builds an image by starting from pure noise and removing a little noise at every step, guided only by your text prompt. ControlNet adds a second, parallel network — a trainable copy of part of the base model — that reads your condition map and, at each denoising step, nudges the image toward matching that structure. The base model is left frozen and untouched, so it keeps all its original quality; the ControlNet copy only adds the steering.
The clever part is the zero-initialized connections between the ControlNet copy and the frozen base model. At the very start of training, those connections output zeros, so ControlNet does nothing and the base model behaves exactly as before. As training proceeds, the connections gradually learn how much to push. This is why adding ControlNet never degrades the original model — it starts as a no-op and only ever adds guidance.
There's one dial you'll always touch: the control strength (sometimes "conditioning scale"). Turn it up and the output hugs your structure tightly, sometimes too rigidly. Turn it down and the model takes more creative liberty, drifting from the reference. Most workflows live in the middle and tune it per image.
The common control types
ControlNet isn't one thing — it's a family. Each "control type" is a separate model trained for one kind of condition. You pick the one that matches the structure you care about. These four cover the vast majority of real work.
| Control type | What the condition looks like | Best for |
|---|---|---|
| Canny / edge | A black image with white outlines of every shape | Keeping the exact silhouette and fine detail of a reference — logos, products, line art |
| Depth | A grayscale map: near things bright, far things dark | Preserving 3D layout and camera perspective — rooms, landscapes, scenes |
| Pose (OpenPose) | A stick-figure skeleton of body keypoints | Locking a character's exact body position without copying their appearance |
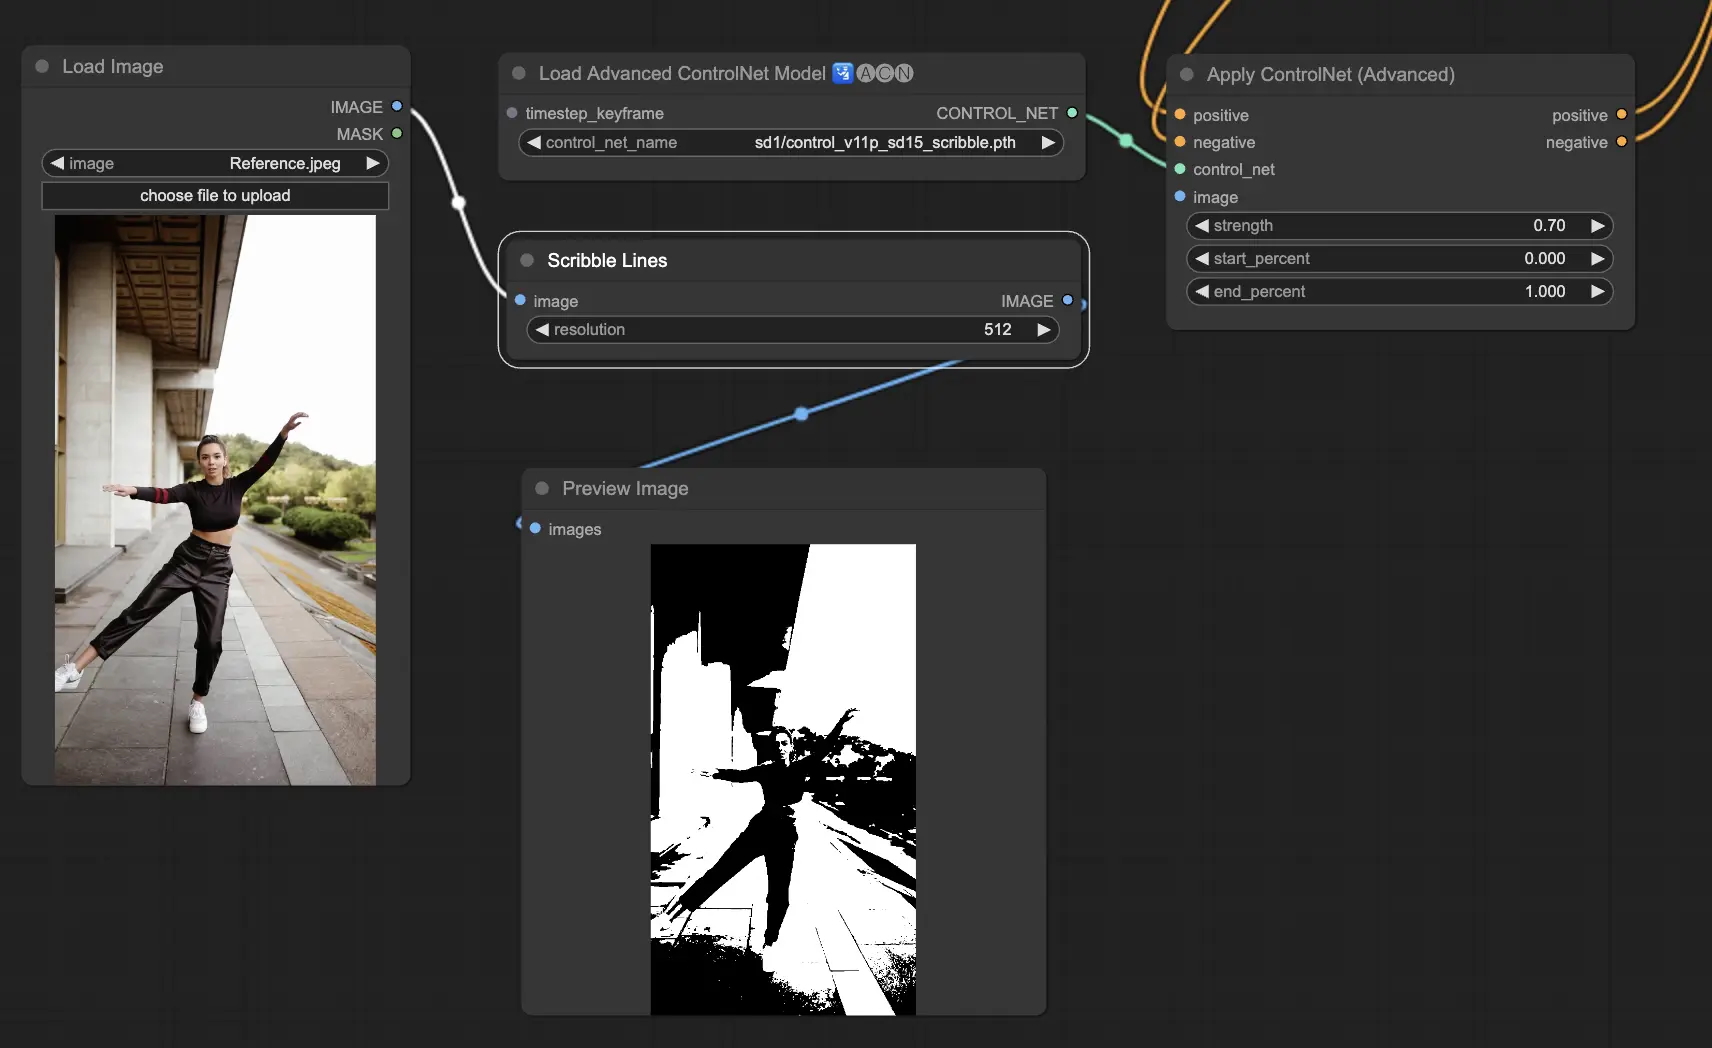
| Scribble / sketch | Rough hand-drawn lines | Turning a quick doodle into a finished image while keeping your composition |
There are many more — segmentation maps (color-coded regions), normal maps, straight-line detection for architecture, and "soft edge" variants that are looser than Canny. But the mental model is identical for all of them: one preprocessor turns your reference into a condition, one matching ControlNet enforces it. You can even stack several at once (say, depth and pose) for layered control, though each one you add makes the generation harder to satisfy.
ControlNet vs image-to-image vs inpainting
ControlNet is easy to confuse with two neighbors that also start from an existing image. They solve different problems, and knowing which to reach for saves a lot of frustration.
- Keeps abstract structure (pose, depth, edges)
- Reinvents all appearance from the prompt
- Best for: same composition, new look
- You choose which structure to lock
- Keeps the actual colors and pixels
- Lightly transforms the whole image
- Best for: style shift, small edits
- A strength dial sets how much changes
- Keeps most of the image untouched
- Regenerates only a masked region
- Best for: fixing or replacing one part
- You paint the area to redo
The simplest way to tell them apart: image-to-image preserves pixels (it transforms what's already there), inpainting preserves everything outside a mask (covered in inpainting and outpainting), and ControlNet preserves only an abstract structure while letting the rest be freshly imagined. Want the same room from a different season? ControlNet on depth. Want this exact photo in watercolor? Image-to-image. Want to swap just the sky? Inpainting. They also combine — ControlNet often runs together with image-to-image or inpainting for layered control.
A practical example
Say you have a photo of a friend standing with arms crossed, and you want a fantasy-wizard illustration in that exact pose — but nothing of the friend's actual face or clothes. Here's the workflow, type-by-type.
- Pick the control type. You care about the body position, not the appearance, so choose a pose ControlNet.
- Preprocess. Run the OpenPose preprocessor on the photo. It outputs a stick-figure skeleton: arms crossed, weight on one leg. The friend's face and clothes are gone — only the pose remains.
- Write the prompt. "An old wizard in flowing blue robes, long white beard, holding a glowing staff, dramatic fantasy lighting, digital painting." This controls everything except the pose.
- Generate with the skeleton attached. The model paints a wizard from scratch but keeps the arms crossed and the stance from your skeleton.
- Tune control strength. Too rigid and stiff? Lower it. The pose drifting away from your reference? Raise it. Re-roll a few times until composition and style both land.
Most tools expose this as a few parameters. In a typical Python pipeline (using the Hugging Face diffusers library) the heart of it looks like this — note that the control image and the prompt are separate inputs:
from diffusers import StableDiffusionControlNetPipeline, ControlNetModel
from controlnet_aux import OpenposeDetector
from PIL import Image

# 1) Preprocess: turn a reference photo into a pose skeleton.
pose_detector = OpenposeDetector.from_pretrained("lllyasviel/Annotators")
condition = pose_detector(Image.open("friend.jpg"))   # stick-figure map

# 2) Load a pose ControlNet on top of a base diffusion model.
controlnet = ControlNetModel.from_pretrained("lllyasviel/sd-controlnet-openpose")
pipe = StableDiffusionControlNetPipeline.from_pretrained(
    "runwayml/stable-diffusion-v1-5", controlnet=controlnet
)

# 3) Generate: prompt controls style, condition controls structure.
image = pipe(
    prompt="an old wizard in flowing blue robes, glowing staff, fantasy art",
    image=condition,                    # the pose skeleton
    controlnet_conditioning_scale=0.8,  # control strength, 0.0-1.0+
).images[0]
image.save("wizard.png")Going deeper
Once the basics click, a few deeper points separate a frustrating ControlNet experience from a smooth one.
Garbage condition, garbage output. ControlNet is only as good as the condition map you feed it. A blurry photo makes a noisy depth map; a cluttered scene makes a tangled edge map; the pose detector can miss limbs in a dark image. When results look wrong, look at the preprocessed condition first — half the time the problem is there, not in the prompt.
Conflicting instructions. If your prompt fights your condition — asking for a "person lying down" while the pose skeleton stands upright — the model gets pulled two ways and produces something distorted. Keep the prompt and the structure in agreement, or deliberately lower control strength so the prompt can win.
Start and end steps. Advanced setups don't apply ControlNet for the whole generation. Applying it only during early denoising steps locks the broad composition but lets the model freely render fine detail later, which often looks more natural than rigid full-strength control. It's a knob worth knowing exists.
The wider conditioning idea. ControlNet was an early, hugely influential answer to a general question — how do you steer a generative model with something other than text? That same impulse shows up across modern image tools: reference-based generation, structural adapters, and lighter-weight conditioning methods all chase the same goal. ControlNet is the clearest way to understand the idea, even as newer architectures repackage it. For the foundation underneath all of this, see what a diffusion model is and Stable Diffusion, the open model ControlNet was first built on.
The durable lesson: text is a fantastic interface for content and a poor one for geometry. Whenever you find yourself re-rolling a prompt to fix where something sits, stop typing and reach for a structural condition instead. That mental switch — from describing to showing — is the whole point of ControlNet.
FAQ
What is ControlNet in simple terms?
ControlNet is an add-on for image generation that lets you give the model a structural reference — a pose, an edge outline, or a depth map — alongside your text prompt. The model invents all the colors and style from your words but follows the structure you supplied, so you control the composition that prompting alone can't pin down.
What is the difference between ControlNet and a prompt?
A prompt describes content (what's in the image, its style and mood) in words. ControlNet supplies structure (where things sit, a pose, perspective) as a reference image. You use both together: the prompt sets the look, ControlNet locks the layout. Text is bad at expressing exact geometry, which is exactly the gap ControlNet fills.
What are the main ControlNet types?
The most common are Canny/edge (keeps shapes and silhouettes), depth (keeps 3D layout and perspective), pose/OpenPose (keeps a body position via a skeleton), and scribble (turns a rough sketch into a finished image). Each is a separate model trained for one kind of condition, and you pick the one matching the structure you want to preserve.
Is ControlNet the same as image-to-image?
No. Image-to-image keeps the actual pixels of a source image and lightly transforms them. ControlNet keeps only an abstract structure — a pose, edges, or depth — and reinvents all the appearance from your prompt. Use image-to-image to restyle a specific photo; use ControlNet to reuse a composition with a completely new look. They can also be combined.
Why is my ControlNet output ignoring the reference?
Usually one of three things: the control strength (conditioning scale) is set too low, the preprocessor produced a poor condition map (check the extracted pose or depth map directly), or the preprocessor doesn't match the ControlNet model — a pose model needs a pose skeleton, not an edge map. Fix the condition first, then tune the strength.
Does ControlNet only work with Stable Diffusion?
ControlNet was first built and popularized on Stable Diffusion, the open diffusion model, which is why most tutorials use it. The core idea — bolting a trainable conditioning network onto a frozen base model — has since been adapted to other architectures, but the clearest place to learn and experiment with it is still the open Stable Diffusion ecosystem.